Content
Background
If data is transferred outside of one's own organisation, it must be examined whether the transfer of the data is lawful or if it must be secured by special contractual regulations in accordance with the law.
The following cases must be distinguished:
- Data is transferred within the EU: It must be checked whether there is a commissioned processing relationship pursuant to Art 28 GDPR or processing by jointly responsible persons pursuant to Art 26 GDPR. If this is the case, a corresponding contractual arrangement must be made for transfer and processing in compliance with the law.
- Data is transferred outside the EU: In addition to point 1, it must also be assessed whether the destination country is a country with an adequate level of data protection and whether appropriate measures should be initiated. In the case of a data transfer outside the EU, a responsible contact person of the external contact for data protection must be named. If a location is in a third country with an adequate level of data protection, the controller does not need any further permission for the data transfer pursuant to Art. 44 et seq. of the GDPR. However, a legal basis within the meaning of Art. 6 (1) GDPR as well as taking the technically necessary measures to protect the data remains. If a site is located in an unsafe third country, data may only be transferred to such a country on the basis of the principles set out in the ECJ's "Schrems II" ruling. Among other things, the new EU standard contractual clauses apply.
Legally compliant protection is usually provided via contractual agreements with the organisation's external contacts. You can create and manage these under Compliance > Contracts & proofs.
These contracts can be included in the processing activities for the sake of thoroughness.
Would you like to learn more about the data processing agreement?
Click here for the wiki article Create a GDPR-compliant data processing agreement.
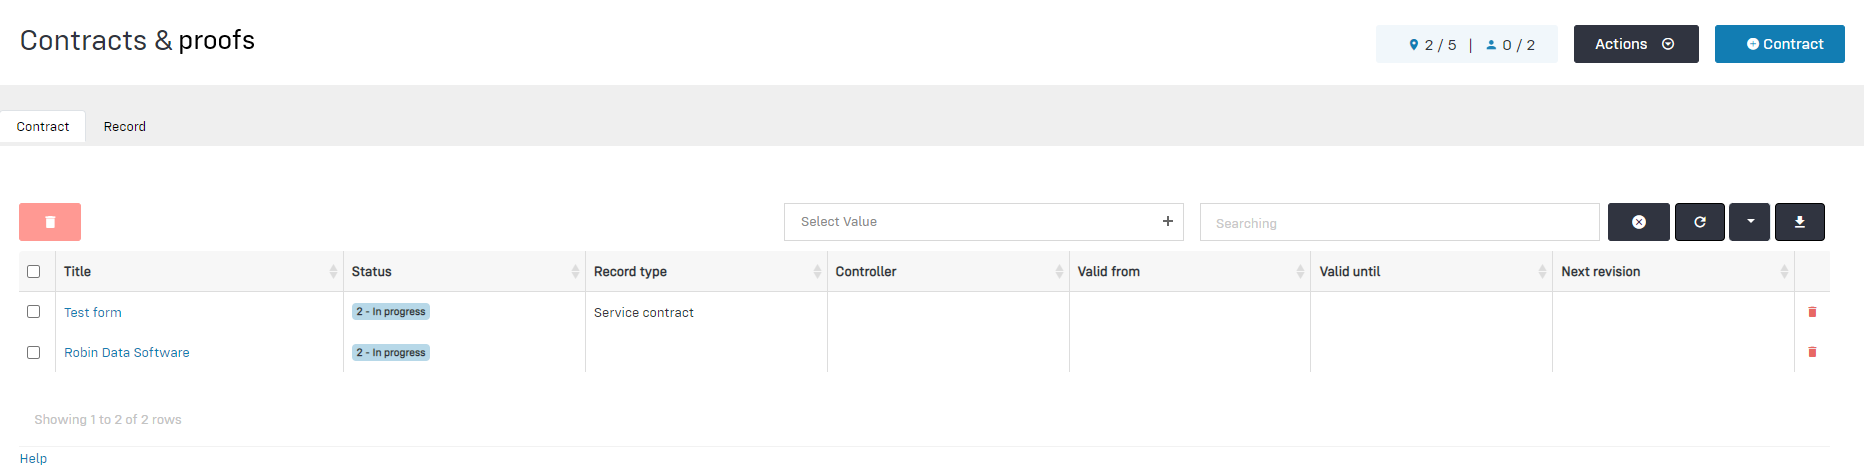
Manage contracts with external contacts
- In the main menu, click on Compliance: A dropdown menu opens.
- In the dropdown menu, click on Contracts & proofs: The table view opens.
The general functionality of the table view is described in the article Using the table view.
In the table view you can see the overview of already created contracts.
Click to enlarge image
Create contracts with external contacts
- In the main menu, click on Compliance: A dropdown menu opens.
- In the dropdown menu, click on Contracts & Proofs: The table view opens.
- Click on the button +Contract: A quick start input mask opens in which the title can be recorded.
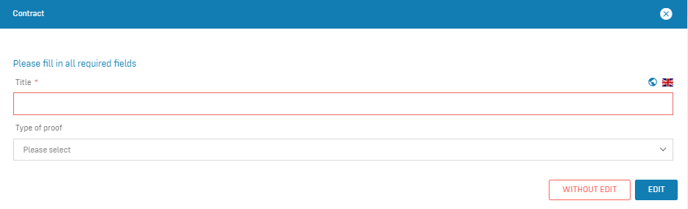
- Assign a title to the contract and, if necessary, select the record type. (If the type is not available in the list, you can create additional evidence types under Organisational Data > Record Type).
- Click on Edit: An input mask opens in which you can specify the contract in more detail.
- Fill out the fields in the input mask. If you have selected a record type on which a form has been defined via content groups, it will be displayed below the Robin Data input fields.
- Click on Save: The contract has been created.
Note
If you select Edit without saving in the quick start window, the contract will be saved in the table view without any further details, and can be edited at a later time.
Click to enlarge image
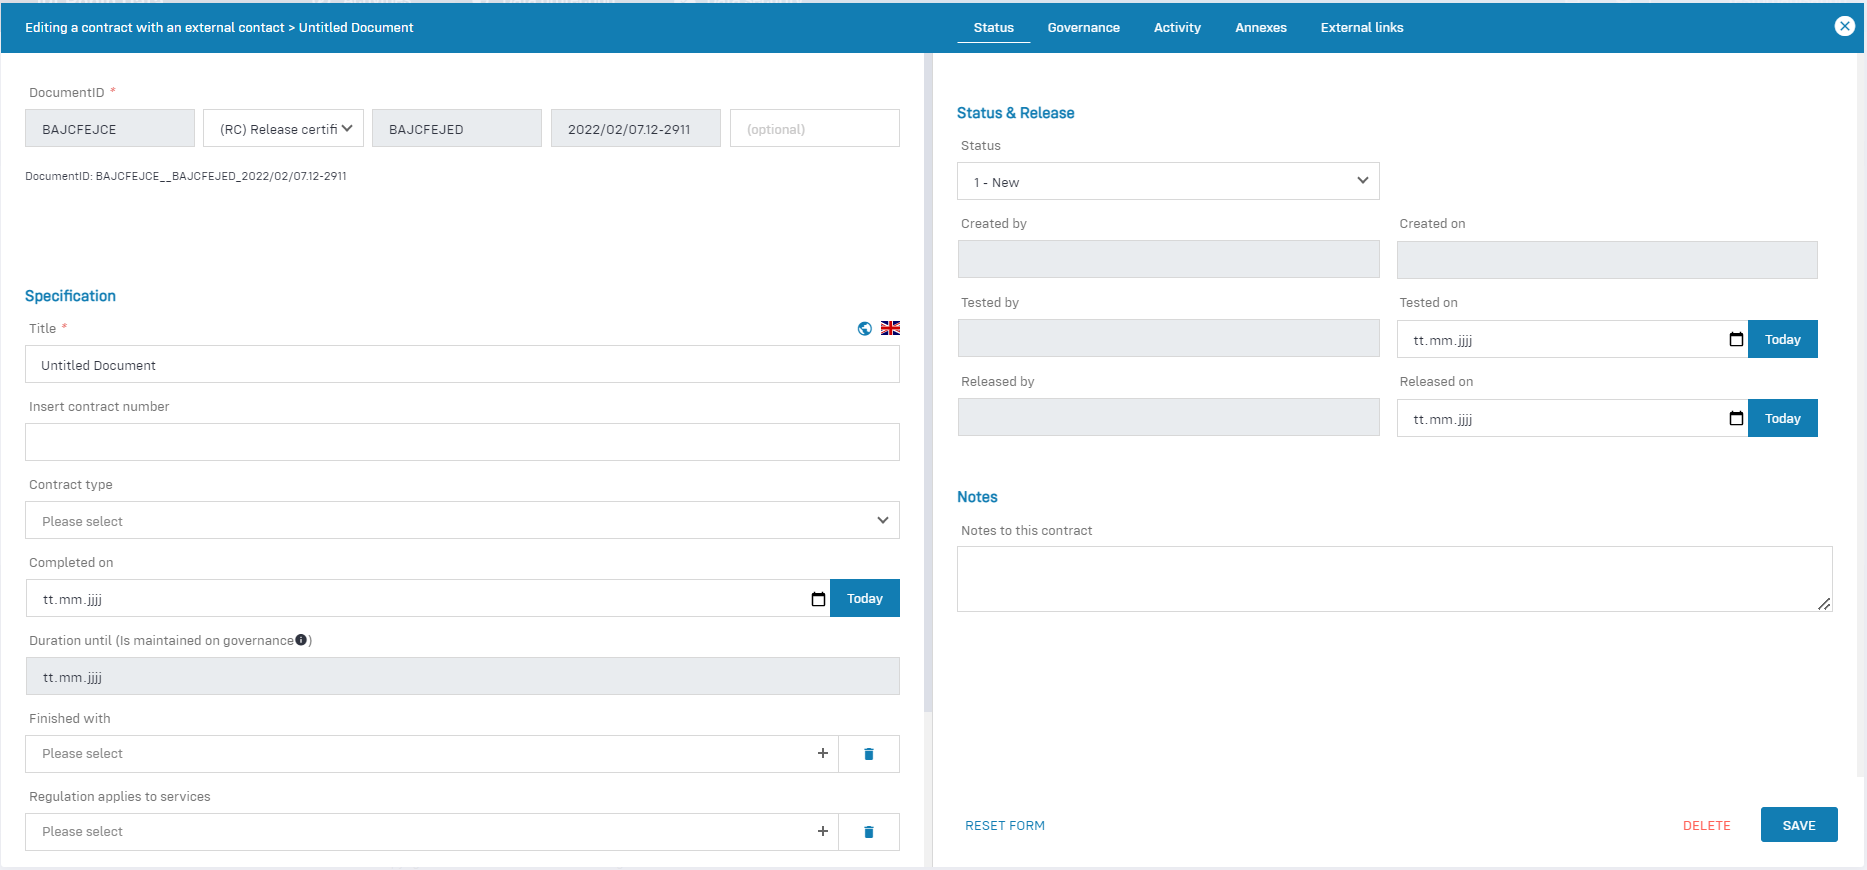
The left form area has the following data areas:
The form is divided into the left area "Creating contract with external contact" and the right area "Status". The left panel has the following data areas:
- Document ID: Assign a document ID to the processing activity, the use of document IDs serves the system-wide unique marking and identification of documents (more information on the help page "Documented Information").
- Specification: Specify the contract and the contractors.
Data area: Specification
This data area has the following form fields:
- Title: Enter the designation of the contract.
- Insert contract number: Enter the contract number if available.
- Contract type: Select the type of the contract. If the type is not available in the list, email us at: support@robin-data.io.
- Completed on: Enter the completion date of the contract.
- Duration until: Specify the duration in the Governance tab.
- Finished with: Select one or more contractors with whom you completed the contract. If there are no contractors to choose from in this list, you must first create them as an external contact under Data protection > External contacts.
- Regulation applies to services: Select the service to which the contract applies. You must create this service first.
- Controller (external): Select the responsible parties of the external contacts with whom the contract was negotiated and concluded. You must create these responsible parties first.
- Next exam on: Specify the date for the next audit in the Governance tab.
The right form area has the following data areas:
- Matcher Tab: You can use the matcher to link documents (such as activities or technical and organizational measures) and view linked documents. The matcher can be used to create additional documents that can be linked to the open record. For a more detailed explanation, see the article Use the matcher.
- Status: Record the status and the release cycle of the contract.
- Governance Tab: The Governance Tab is equally available in several documents in the Robin Data software. It offers the possibility to record various basic parameters for the respective document. a more detailed explanation can be found in the article Manage Governance Content.
- Attachments tab: In this tab you can add related documents by clicking the Add Attachment button. For a more detailed explanation, see the article Use input masks with forms.
- External Links Tab: In this tab you can link related information using the Add external link button. For a more detailed explanation, see the article Use input masks with forms.
Note
The functions of the former Activities tab have been integrated into the Matcher tab. The Matcher can be used to create activities and link them to records.
Data area: Status
In this data area it is possible to manage the status of a document and to map the release procedure of a contract.
Note on the status of the contract
- A contract is usually drawn up by one person, for example the employee of a specialist department.
- In addition to this person, another person should check whether the contract has been drawn up correctly and whether a legitimate interest is well founded. This can be done by the data protection officer, for example.
- At the end of the chain, someone must officially approve the contract. This can be done, for example, by the supervisor.
This data area has the following form fields:
- Status: Indicate the current processing status of the contract.
- Created by: Indicate the person who created this contract.
- Created on: Enter the date on which the creation of this contract was completed.
- Tested by: Enter the person who reviewed this contract.
- Tested on: Enter the date the review of this contract was completed.
- Released by: Enter the person who released this contract.
- Released on: Enter the date this contract was released for use.
- Notes: Add notes about the contract.
- Color coding of the document: Assign a color code to the document. Color codes are defined via Organisational data > Management system > Content groups.
Create record
Records serve as documentation and are important when it comes to a performance test of an implemented requirement, law or standard.
- In the main menu click on Compliance: A drop-down menu opens.
- From the drop-down menu, click on Contracts & Proofs: The table view in the tab "Contract" opens.
- Switch to the tab Records: The table view in the records tab opens.
- In the table view click on the button +Records: The quick start input mask opens.
- Assign a title for the record and, if necessary, select the record type. (If the type is not available in the list, you can create additional evidence types under Organisational data > Basic data > Record Type).
- Click on Edit: An input mask opens in which you can specify the record in more detail. The standard fields of the opened input mask do not contain any other fields besides the name and the evidence type. If you have selected a record type to which a form has been defined via content groups, this will be displayed below the Robin Data input fields.
- Click Save: Your content for the record has been saved.
Further questions? - We are here for you.
If you have any questions about the software, please contact our support team. You can reach us at support@robin-data.io.