Content
Background
Personal data may only be processed or stored until:
- They are no longer required by law
- The purpose of the processing as defined in the processing activity has expired
- Data subjects request erasure of their personal data in accordance with Art. 17 GDPR and there is no other legal obligation against such erasure.
To keep an overview of which personal data is processed in an organisation, each organisation should create a so-called "erasure concept".
Since there is on legal requirement as to what a erasure concept should look like, it is a good idea to implement it on the basis of DIN 33698 "Guideline for the development of a erasure concept with derivation of erasureperiods or personal data."
In essence, the erasure concept according to DIN 33698 is structured as follows:
- The basis of the erasure concept is the types of data recorded in the record of processing activities. Data types are usually categories of documents, such as business letters, quotation documents, e-mails, etc., that are used in an organisation.
- Legal retention periods are defined for data types. Data types plus retention periods form the basis for creating so-called erasure classes. Example: The data type "order data of a roofing company" has a legal retention period of 10 years, which results from the German Commercial Code.
- Erasure classes combine one or more data types. The common feature is that the data types contained in an erasure class are assigned a common erasure period. Once the erasure period has been reached, the personal data must be deleted or the complete documents destroyed. For the above example, this means that the roofing documents should be deleted after 10 years.
- In many cases, it may make sense for types of data to be stored and processed beyond the legal retention period. Accordingly, there is a legitimate interest for further processing, which must be explicitly justified in the erasure concept. In the case of the roofing company, a legitimate interest can be justified by the fact that roofs usually show damage only after 20 or more years and that it therefore makes sense not to delete the order documents for the roofing company after 10 years, but to keep them for at least 20 or more years. This procedure is certainly also in the interest of the customer.
- In addition, for each erasure class it is defined from when the observation period for the calculation of an erasure class runs. This can be "from the end of a contractual relationship", "from the end of a transaction" or "from the time of data collection". For the roofing company, the erasure period would start "from the end of the operation", i.e. the acceptance of the roof.
- The last thing to consider is how sensitive or in need of protection the types of data in the erasure class are. It is logical that a personnel file has a higher protection requirement than a "normal" business e-mail. This must be taken into account when deleting data, for example, if a professional disposal company is contracted to delete or destroy data. A good reference work for the destruction of documents is DIN 66399.
- In summary, the erasure class thus describes which types of data are to be deleted and when.
- To implement the erasures, a so-called erasure rule must be defined for each erasure class. The erasure rule describes when and how the data to be deleted is to be deleted. In the case of the roofing company, for example, the erasure rule could read as follows: "On Feb. 1 of each year, delete all order documents for roof projects that have been archived for at least 20 years since the roof was accepted. Delete these records through the Meier disposal company and have the erasure confirmed."
- Each erasure should be recorded as an activity in the order to be verifiable.
In summary, a erasure concept consists of the following components:
- Erasure classes with data types, erasure periods and the protection requirements of the data to be deleted.
- Start time from which the erasure period is calculated.
- If applicable, justification of a erausreperiod for a data type that deviates from the legal retention period.
- Erasure rule for each erasure class, which defines how the corresponding data is to be deleted on the basis of the protection requirement, e.g. on the basis of DIN 66399.
In the Robin Data Software, the above information is to be recorded as compactly and simply as possible.
Manage a erasure concept
- In the main menu click on Data protection: A dropdown menu will open.
- In the dropdown menu click on Erasure concept: The table view will open. In the table view you can see the overview of the already created erasure classes in the first tab, in the second tab you can see the already created erasure rules.
The general functionality of the table view is described in the article Using the table view.
.png?hsLang=en)
Click to enlarge the image
In the table view, you can see the overview of the erasure classes that have already been created.
Create a erasure concept
The erasure concept results from the erasure classes to be defined (incl. data types, erasure periods and protection requirements of the data to be deleted), the start time (from which the erasure period is calculated), if necessary a justification of an erasure period of a data type that deviates from the legal retention period as well as the erasure rule per erasure class that defines how corresponding data is to be deleted.
- In the main menu click on Data protection: A dropdown menu will open.
- In the dropdown menu click on Erasure concept: The table view will open.
- Click on the button +Erasure class: A quick start input mask opens in which the title can be recorded.
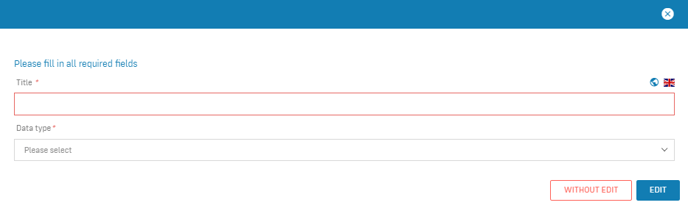
- Fill out the fields of the quick start input mask.
- Click on Edit: An empty input mask will open.
- Fill out the input mask. The individual fields of the left form area and the right form area are described below.
- Click on Save: The erasure concept has been created and will appear in the table view.
Note
If you select Save without editing in the quick start window, the erasure class will be saved in the table view without any further details, and can be edited at a later time.
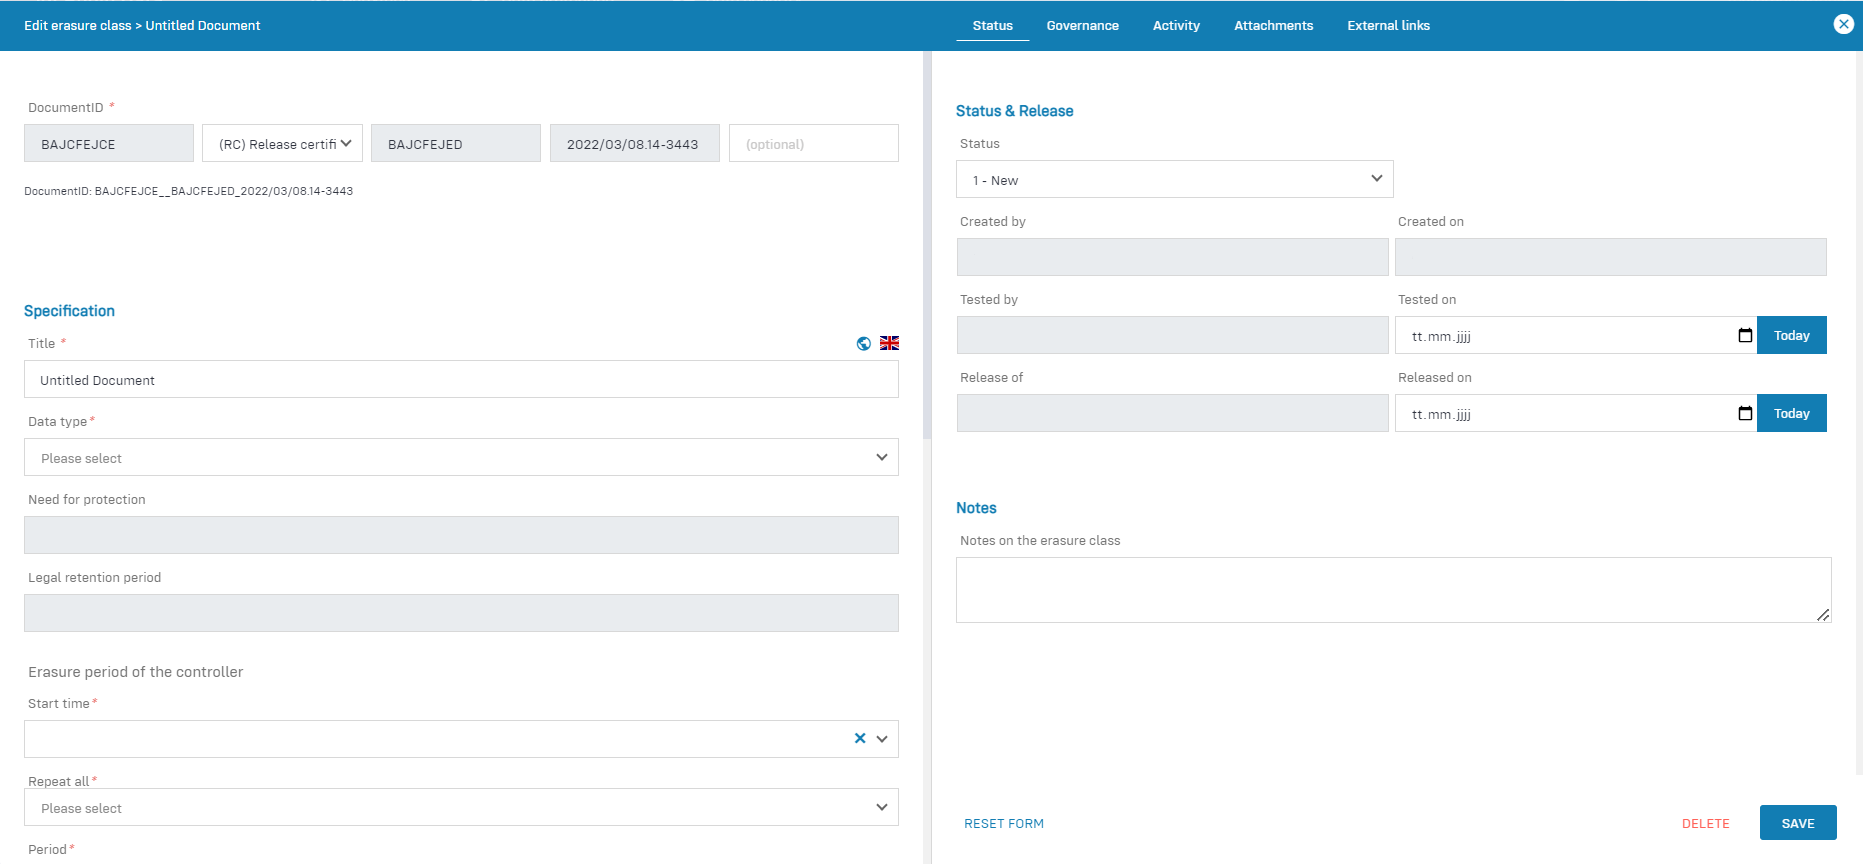
Data areas of the input mask
Click to enlarge the image
The left form area has the following data areas:
- Document ID: Assign a document ID to the processing activity, the use of document IDs serves the system-wide unique marking and identification of documents (more information on the help page "Documented Information").
- Specification: Important basic data for the erasure class according to DIN 66398, such as the retention and erasure period provided by Robin Data.
- Erasure period of the controller: A recurring time at which the data must be deleted.
- Legal evaluation: Specific legal bases that justify deviations of the erasure period from the legal retention period
- Realisation: A recurring time at which the data must be deleted and information about which technique or service is used to perform the erasure.
Data area: Specification
This data area has the following form fields:
- Title: Enter a title for the erasure class. Since there can be several erasure classes for the same data types (e.g. applications), this should include the data type concerned.
- Data type: Specify the data type (e.g. applications, business letter) to be handled in this erasure class.
- Need for protection: The protection requirement of the data type. This was previously defined in the data type and is automatically applied.
- Legal retention period: The legal retention period defined in the data type, which change annually. Robin Data automatically adjusts this retention period for data types defined by Robin Data in case of legal changes.
Data area: Erasure period of the controller
- Start time: Select from which time the calculation of the erasure period should start.
- Repeat all: The number of periods from which - retroactively - data must be deleted (example: period = year, number of periods = 10, time of erasure: 01.10.2019 --> all data types from the years 2009 and older can be deleted).
- Period: The consideration period in which repeated data must be deleted.
- Description: Add a description to the erasure period.
By clicking on the respective tab entries on the left side of the screen, you can switch between these data areas.
Data area: Legal evaluation
This data area has the following form fields:
- Specific legal basis: Select a rule in data protection law that allows or requires a deviation of the erasure period from the legal retention period.
- Supplementary legal information: Add any additional legal specific notes regarding the erasure period deviating from the legal retention period.
Data area: Realisation
This data area has the following form fields:
- Erasure rule: This data area is now available in the matcher tab. Assign a defined erasure rule to the erasure class. You define the erasure rule under Data protection > Erasure concept > Action: Erasure rule.
- Implementation by: This data area is now available in the matcher tab. Select a service with which you want to delete the data types of the erasure class. You can create a service under Compliance > Services.
- Note on the erasure process: Add a note to the erasure process.
The right form area has the following data areas:
- Matcher: Via the matcher you can link documents as well as view linked documents.
- Status Tab: In this tab it is possible to manage the status of a document and to store notes about the erasure class.
- Governance Tab: The Governance Tab is equally available in several documents in the Robin Data software. It offers the possibility to record various basic parameters for the respective document. a more detailed explanation can be found in the article Manage Governance Content.
- Attachments tab: In this tab you can add related documents by clicking the Add Attachment button. For a more detailed explanation, see the article Use input masks with forms.
- External Links Tab: In this tab you can link related information using the Add external link button. For a more detailed explanation, see the article Use input masks with forms.
Note
The functions of the former Activities tab have been integrated into the Matcher tab. The Matcher can be used to create activities and link them to records.
Data area: Status & release
In this data area it is possible to manage the status of a document and to map the release procedure of the document.
- An erasure class is usually created by one person, for example the employee of a specialist department.
- In addition to this person, another person should check whether the erasure class has been drawn up correctly and whether a legitimate interest is well-founded. This can be done by the data protection officer, for example.
- At the end of the chain, someone must officially release the erasure class. This can be done, for example, by the supervisor.
This data area has the following form fields:
- Status: Indicate the current processing status of the erasure class.
- Created by: Specify the person who created this erasure class.
- Created on: Enter the date on which the creation of this erasure class was completed.
- Tested by: Enter the person who reviewed this erasure class.
- Tested on: Enter the date when the review of this erasure class was completed.
- Released of: Enter the person who released this erasure class.
- Released on: Enter the date this erasure class was released for use.
- Notes: Add notes to the erasure class.
- Color coding of the document: Assign a color code to the document. If you have added color coding to your documents via Organisational data > Management system > Content groups, it will be displayed here.
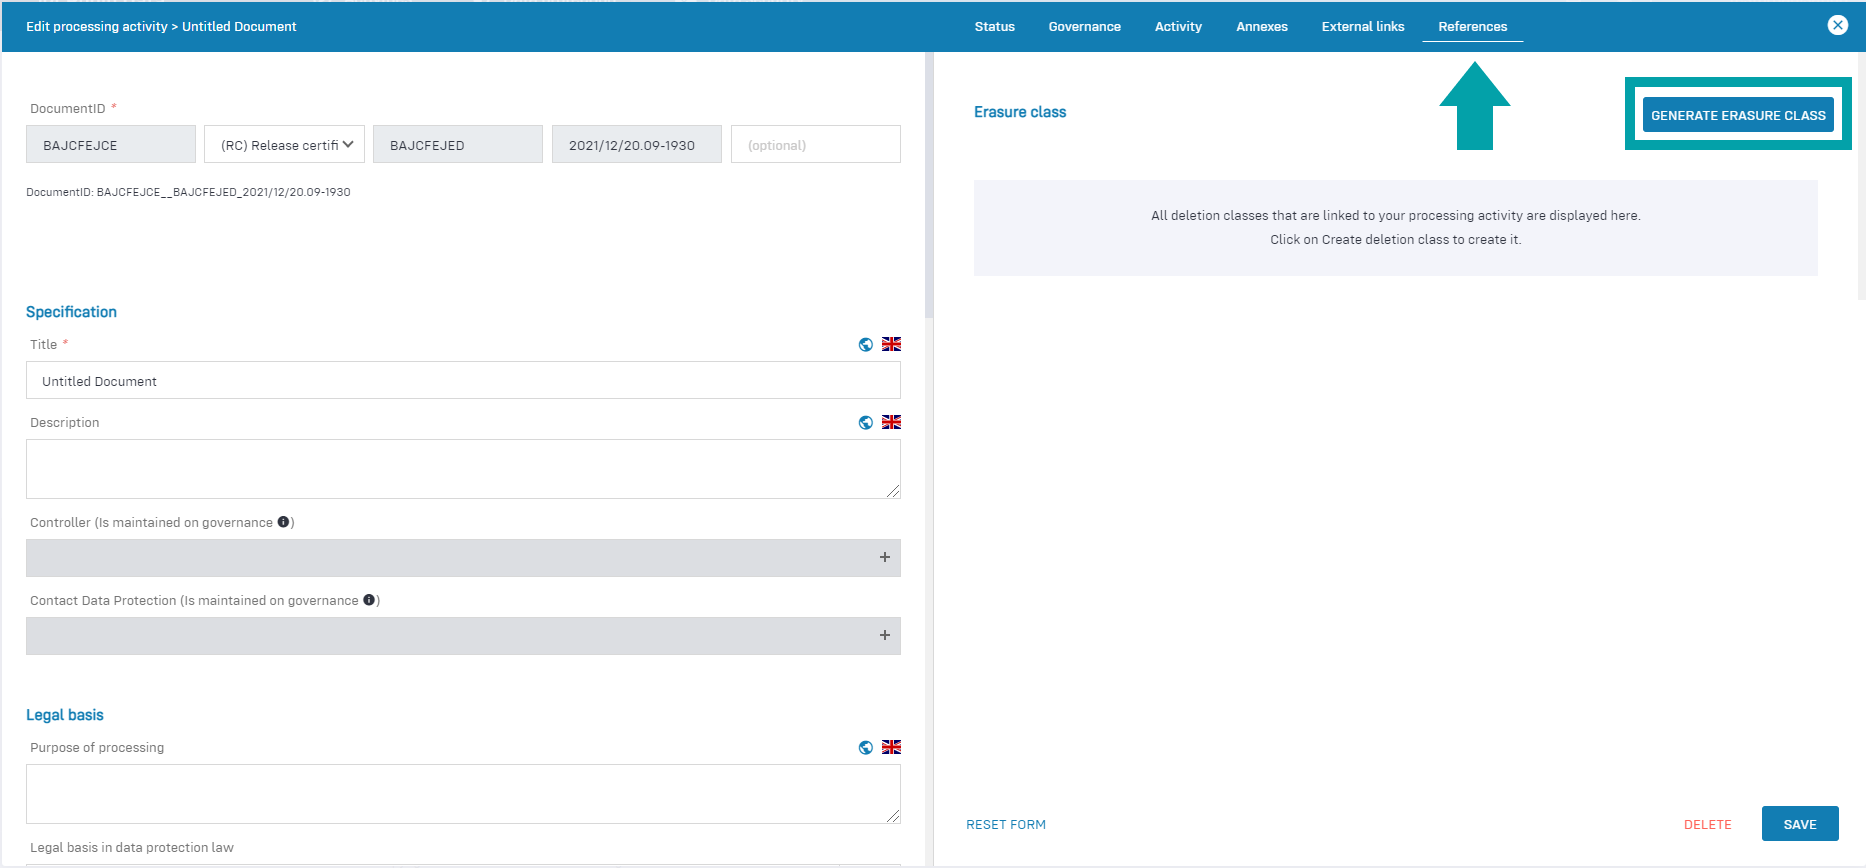
Automatically generate erasure class from a processing activity
You can generate erasure classes directly from a processing activity at the click of a button. The erasure class is generated based on the data types of the respective processing activity.
The generated erasure classes are stored under Data protection > Erasure concept and displayed in the generating processing activity. Generated erasure classes contain all relevant information that is also recorded when the erasure class is created manually.
- In the main menu click on Data protection: A dropdown menu will open.
- In the dropdown menu click on List of processing activities: The table view will open.
- In the table view, click on the processing activity you would like to edit: The input mask for the processing activity opens.
- Click on the Status tab in the form view on the right: The status tab opens.
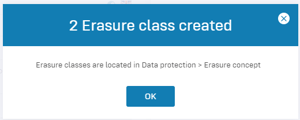
- Click the Generate erasure class button: the Create erasure classes module window opens. Erasure classes are now automatically created according to the data types present in the processing activity.
- Then click on Save: The processing activity has been saved.
You will then find the generated erasure classes under the menu item Data protection > Erasure concept. You can then adapt these to your needs if necessary.
Note
If you have already created erasure classes for a data type, you will receive the message "0 erasure classes created". In this case, please check whether erasure classes have already been created for this data type under Data protection > Erasure concept > Erasure classes.
Click on the image to make it larger.
Create erasure rule
Each erasure class requires a so-called erasure rule, which describes when and how data is to be erased. The erasure rule is defined on the basis of the protection requirement, e.g. on the basis of DIN 66399.
Example erasure rule
In the case of the roofer, for example, the erasure rule could be as follows: "On February 1 of each year, erase all order documents for roof projects that have been archived for at least 20 years since the roof was accepted. Delete these records through the Meier disposal company and have the erasure confirmed."
- From the main menu, click on Data Protection: a dropdown menu will open.
- In the dropdown menu, click on Erasure concept: the table view opens.
- Click the Erasure rules tab in the table view: the Erasure Rules tab in the table opens.
- Click on the +Erasure rule button: an empty input mask opens.
- Fill in the fields of the opened input mask and choose between the interval Series type or Date: further options will open depending on the selection. These are explained below.
- Click Save: The erasure rule has been created.
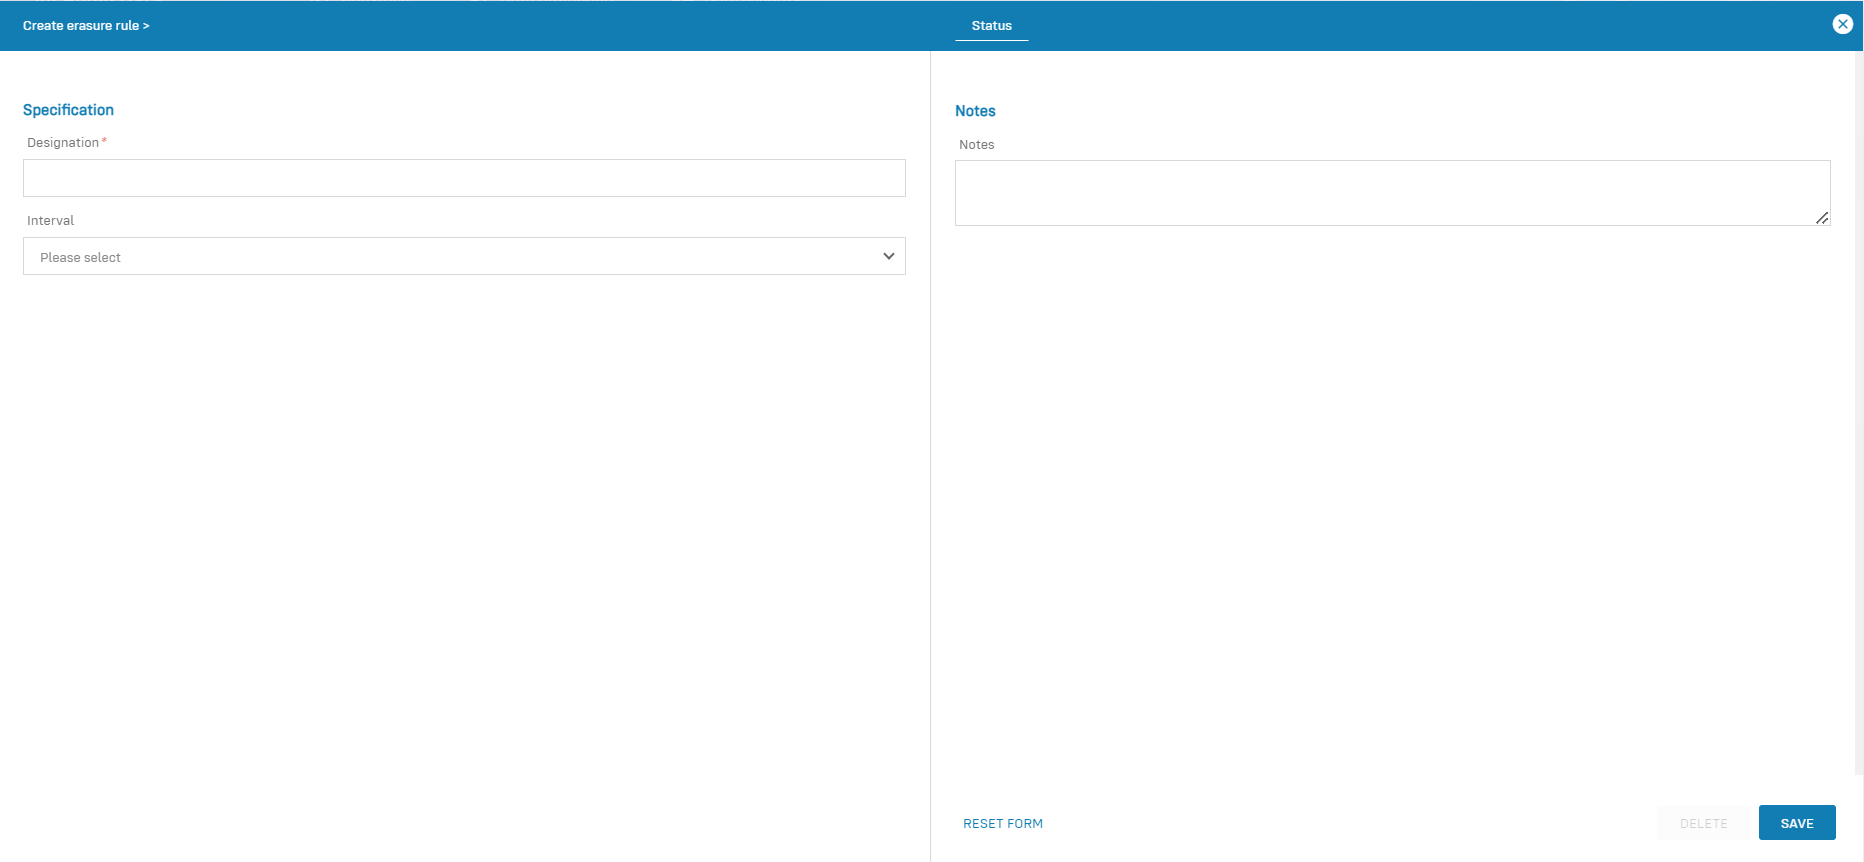
Click on the image to make it larger.
Data area: Series type
In this data area it is possible to set the interval of the erasure class to one the interval series type. This data area has the following form fields:
- Number: specify here the number for the selected period. For example: 2 years - the erasure rule occurs every second year.
- Period: specify the periodicity at which the erasure rule should be executed.
- Create start time: Specify a start date for the erasure rule.
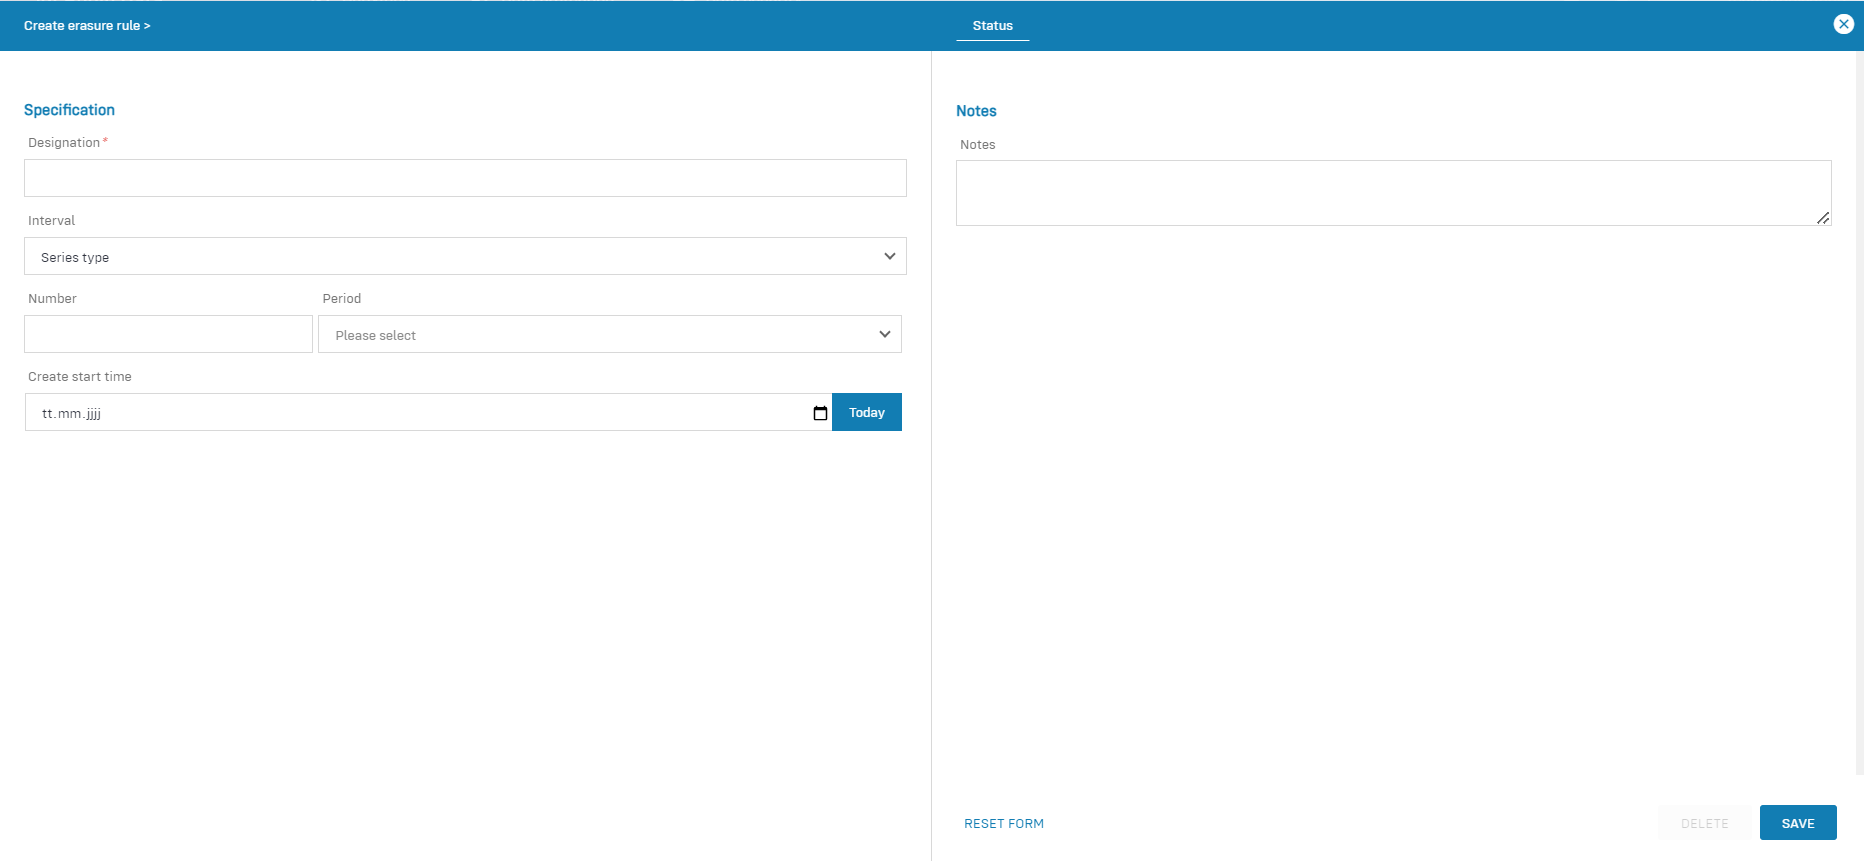
Click on the image to make it larger.
Data area: Date
In this data area it is possible to set the interval of the erasure class to a specific date. This data area has the following form fields:
- On: Specify the day on which the erasure rule should be executed once.
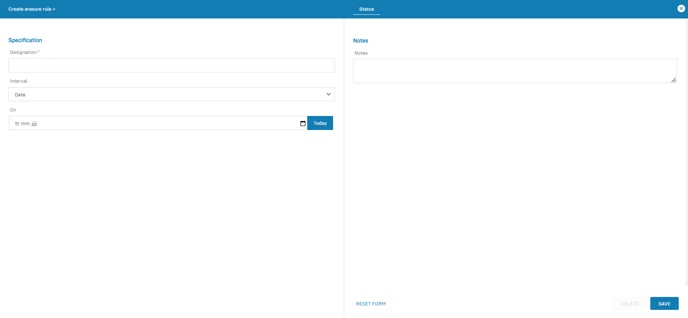
Click on the image to make it larger.
Further questions? - We are here for you.
If you have any questions about the software, please contact our support team. You can reach us at support@robin-data.io.